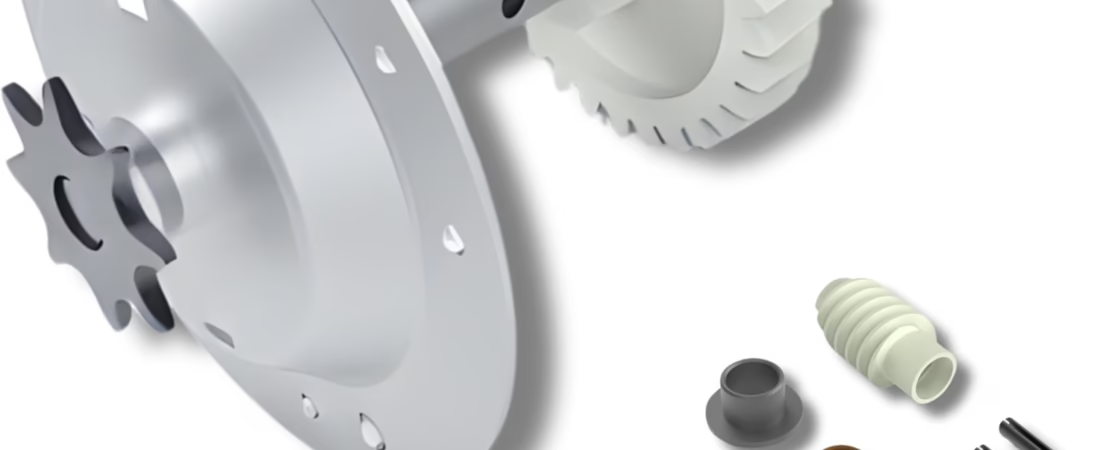
A garage door opener can operate quietly and reliably for years, but its internal mechanical components are subject to repeated movement and load every time the door opens or closes. In chain-drive systems, the motor’s power is transferred through a series of gears and mechanical components before it reaches the chain and ultimately moves the garage door. When one of those components becomes worn or damaged, the opener may develop unusual noises, stop moving the chain correctly, or fail to operate the door as expected.
For some compatible LiftMaster, Chamberlain, Sears, and Craftsman chain-drive openers, a gear and sprocket repair kit can address wear in the drive mechanism without replacing the entire opener. The Replacement for LiftMaster 41C4220A Gear and Sprocket Kit is designed for compatible 1/3 HP and 1/2 HP chain-drive garage door opener models.
The 41C4220A part number is associated with a complete chain-drive gear and sprocket replacement assembly. Chamberlain’s official parts information identifies 041C4220A as a replacement kit for various LiftMaster and Chamberlain chain-drive garage door openers and notes that compatibility should be verified against the opener’s owner’s manual or replacement-parts diagram. The manufacturer also identifies related part numbers including 41A2827, 41C4220C, and 41C4220.
This distinction is important because garage door openers can look very similar while using different internal components. A gear kit that fits one chain-drive model should not automatically be assumed to fit another.
This guide explains what the gear and sprocket assembly does, why these parts wear, what a replacement kit is intended to accomplish, how it can be used, what to verify before installation, and how this type of repair compares with replacing an entire garage door opener.
Understanding the Gear and Sprocket System
A chain-drive garage door opener uses mechanical components to transfer the motor’s rotation into movement of the garage door.
The motor itself does not directly pull the garage door upward. Instead, its rotational force passes through the opener’s internal drive system. Gears transmit and modify that motion, while the output shaft and sprocket interact with the chain mechanism.
Over thousands of operating cycles, the gears can experience considerable mechanical stress.
One commonly replaced component is the main drive gear assembly. Depending on the opener’s design and operating conditions, wear can eventually affect the teeth of the gear, the worm gear, bushings, bearings, or related components.
A gear and sprocket kit is designed to replace several of these wear-related parts together.
This approach can be useful because replacing only one visibly damaged component may leave other worn components inside the drive assembly.
The exact internal arrangement varies by opener model, which is why identifying the correct replacement part is an essential step before beginning the repair.
What Is the 41C4220A Gear and Sprocket Kit?
The 41C4220A is a chain-drive gear and sprocket replacement kit associated with compatible LiftMaster and Chamberlain-family garage door openers.
Chamberlain’s official parts listing describes the kit as including a helical gear and top-hat assembly, worm gear, wear bushings, grease, and the hardware needed to replace the chain-drive gears. The manufacturer also states that the part is intended for various chain-drive openers manufactured after 1993 and advises users to verify compatibility using the owner’s manual or replacement-parts diagram.
The Amazon product referenced here is marketed as a replacement for the 41C4220A and is described for compatible Chamberlain, Sears, Craftsman, and LiftMaster 1/3 HP and 1/2 HP chain-drive models.
Because the product is a replacement component rather than a complete garage door opener, it is intended for repair situations where the existing opener’s other major components remain serviceable.
That makes model identification particularly important.
Key Components and Features
Gear and Sprocket Assembly
The gear and sprocket assembly is central to the repair.
The gear transfers rotational force through the opener’s drive system, while the sprocket interfaces with the chain.
When these components become worn, the opener may no longer transfer motor power effectively.
A replacement assembly gives the repairer a way to restore the relevant mechanical components without replacing the entire motor unit.
Helical Gear
The helical gear is part of the internal drive mechanism.
Its teeth engage with the corresponding worm gear to transfer the motor’s rotational movement.
Because the gear is exposed to repeated mechanical loads, wear can eventually occur.
Replacing the gear as part of a complete kit can be more practical than attempting to replace only a visibly damaged section.
Worm Gear
The worm gear works together with the larger helical gear.
This gear arrangement is designed to transmit rotational force while changing the mechanical relationship between the motor and output mechanism.
A worn worm gear can contribute to abnormal operation, noise, or ineffective power transfer.
Including the worm gear in a replacement kit allows the mating gear surfaces to be renewed together.
Bushings and Bearings
The gear assembly depends on supporting components that allow shafts and other rotating parts to move correctly.
Bushings and bearings can wear over time.
Replacing these components during a gear repair can help address related wear rather than installing a new gear onto old supporting parts.
The exact components included should be confirmed against the particular kit listing and opener requirements.
Grease
The official Chamberlain description identifies grease as part of the 041C4220A kit.
Proper lubrication is important in mechanical gear systems because it helps reduce friction and supports smoother movement.
The correct lubricant and application method should follow the manufacturer’s installation instructions.
Using an inappropriate lubricant or applying excessive grease can create its own problems.
Replacement Hardware
A complete gear-and-sprocket repair assembly can include small hardware components required to secure the replacement parts.
These components are easy to overlook when buying individual parts separately.
Having the appropriate hardware available can simplify the repair process.
Why Garage Door Opener Gears Wear
Garage door openers operate under repeated mechanical load.
Every opening cycle requires the motor and drive mechanism to move the door through its travel.
The weight and balance of the garage door also influence the workload placed on the opener.
If the garage door is properly balanced, the opener does not have to overcome the full weight of the door by itself. If the door becomes difficult to move manually because of spring, roller, track, or other mechanical problems, the opener may experience abnormal loads.
This is one reason a worn gear should not automatically be treated as the only problem.
A replacement gear may restore the drive mechanism, but if an underlying door problem remains, the new component can be subjected to unnecessary stress.
Signs That a Gear Problem May Be Present
A garage door opener can behave differently when its internal gears begin to wear.
Possible symptoms can include:
- The motor runs but the chain does not move normally
- Grinding or unusual mechanical noise
- Intermittent movement
- The door begins moving and then stops
- The opener operates without transferring motion effectively
- Visible damage to the drive components during inspection
These symptoms are not exclusive to a damaged gear.
A similar problem can result from issues involving the chain, sprocket, motor, control electronics, door balance, springs, tracks, or other components.
Diagnosis should therefore come before ordering a replacement part.
How It Can Be Used
Repairing a Compatible Chain-Drive Opener
The primary purpose of the gear and sprocket kit is to replace worn internal drive components in a compatible chain-drive garage door opener.
The general repair process involves accessing the opener’s drive mechanism, removing the worn components, installing the replacement assembly, applying the appropriate lubricant, and reassembling the unit.
The exact procedure varies by model.
Users should follow the specific installation instructions for the opener and replacement part rather than relying solely on a generic procedure.
Restoring Mechanical Power Transfer
When the relevant gears are worn, the motor may continue operating while mechanical power is no longer transferred correctly to the chain.
Replacing the affected drive components can restore the intended mechanical connection if the rest of the opener is functioning correctly.
The repair therefore focuses on the drive system rather than the electronics or garage door itself.
Maintaining an Older Garage Door Opener
Some homeowners prefer repairing an existing opener when its overall condition remains satisfactory.
A replacement gear kit provides one option for addressing a specific mechanical failure.
This can be particularly relevant when the opener has a compatible design and the rest of the system remains functional.
However, the age and overall condition of the opener should be considered before investing time in a repair.
Who It May Be Suitable For
Homeowners With Compatible Chain-Drive Openers
A homeowner whose opener matches the required part number and configuration may consider a gear-and-sprocket replacement as part of a mechanical repair.
The critical condition is compatibility.
DIY Repairers
People who are comfortable working with mechanical equipment may be able to perform this type of repair if they have the correct instructions, tools, and understanding of garage door opener safety.
This is not a casual maintenance task, however.
The opener contains moving mechanical components and electrical connections, while the garage door itself can be heavy and potentially dangerous.
Garage Door Technicians
Professional technicians may encounter worn gear assemblies during service work.
A complete replacement kit can provide multiple related components in one repair package.
Owners of Older Chain-Drive Systems
Older compatible openers can sometimes continue operating effectively when individual wear components are replaced.
Whether repair makes sense depends on the opener’s overall condition, availability of replacement parts, safety features, and the owner’s requirements.
Important Compatibility Considerations
Check the Exact Opener Model
The most important step before ordering a gear kit is identifying the garage door opener’s actual model number.
Do not rely solely on the brand name.
LiftMaster, Chamberlain, Sears, and Craftsman have produced many different opener configurations over the years.
Two openers from the same brand can use different drive components.
Chamberlain specifically recommends checking the owner’s manual or replacement-parts diagram to confirm compatibility.
Confirm Chain-Drive Configuration
The 41C4220A family of components is associated with chain-drive garage door openers.
A screw-drive opener uses a different drive mechanism.
A belt-drive opener also uses a different transmission arrangement.
Therefore, the replacement part should not be selected solely because the horsepower rating looks correct.
The opener must use the appropriate chain-drive configuration.
Check Horsepower
The Amazon listing identifies compatibility with 1/3 HP and 1/2 HP chain-drive models.
Horsepower can be a useful starting point, but it is not sufficient by itself to establish compatibility.
The model number and parts diagram remain more reliable identification methods.
Check the Manufacturing Era
There is some variation in published compatibility information for 41C4220A-related parts.
Chamberlain’s official listing describes the 041C4220A as intended for various chain-drive openers manufactured after 1993.
Other parts sources list broader compatibility extending into earlier production years for certain configurations.
Because of this variation, the safest approach is to verify the exact opener model and corresponding replacement-part number rather than assuming that the manufacturing year alone determines compatibility.
Check for Unusual Sprocket Configurations
Some garage door openers may use configurations that differ from the standard arrangement.
Certain parts sources specifically warn against using the kit with openers that have dual sprockets on the output shaft.
This illustrates why visual comparison and model-specific documentation are important.
Garage Door Safety Before Repair
A garage door opener is not an ordinary household appliance.
The door itself can weigh hundreds of pounds, and the counterbalance system can contain highly loaded springs.
Before performing work on an opener, disconnect electrical power according to the manufacturer’s service procedure.
Do not work on a garage door’s torsion or extension springs unless you have the appropriate training and equipment. Spring systems can store substantial mechanical energy and can cause serious injury if improperly handled.
A gear replacement should also not be used as an opportunity to experiment with the door’s spring system.
If the door is unbalanced, the tracks are damaged, or the springs show signs of failure, professional service may be appropriate.
A General Overview of the Repair Process
The exact steps depend on the opener model, but understanding the general workflow can help explain what the kit is intended to replace.
Step 1: Identify the Opener
Locate the model number on the opener housing.
Record the full model designation rather than only the brand.
Compare it with the replacement-part information.
Step 2: Confirm the Replacement Part
Verify that the required part is 41C4220A or an officially identified equivalent for the opener.
Do not proceed based only on physical similarity.
Step 3: Disconnect Power
Follow the manufacturer’s procedure for disconnecting electrical power before accessing the opener.
This helps reduce the risk of accidental motor operation while the housing is open.
Step 4: Access the Drive Assembly
The opener housing may need to be opened to reach the gear and sprocket assembly.
Follow model-specific instructions for removing covers and components.
Step 5: Inspect the Existing Components
Examine the gears, worm gear, bushings, bearings, sprocket, and related hardware.
Look for worn teeth, damaged surfaces, excessive play, or other signs of mechanical deterioration.
Step 6: Remove the Worn Assembly
Remove the existing drive components using the appropriate tools and procedure.
Avoid forcing components that do not release normally.
Step 7: Install the Replacement Components
Install the replacement gear, worm gear, sprocket assembly, bushings, bearings, and hardware according to the instructions.
Make sure components are oriented correctly.
Step 8: Apply Appropriate Lubrication
Use the supplied or manufacturer-recommended grease according to the installation instructions.
Do not assume that more lubricant is necessarily better.
Step 9: Reassemble and Test
Reassemble the opener carefully before restoring power.
Test operation according to the manufacturer’s procedure.
Observe the opener and garage door during initial operation.
If unusual grinding, binding, vibration, or other abnormal behavior remains, stop using the system and investigate the underlying issue.
Why the Entire Gear Assembly May Be Replaced
It can be tempting to replace only the visibly damaged gear.
However, multiple components in a mechanical drive system work together.
If one gear has worn significantly, its mating components and supporting bushings may also have experienced wear.
A kit that includes multiple related components can therefore address several potential wear points at once.
The official 041C4220A description includes the helical gear and top-hat assembly, worm gear, wear bushings, grease, and hardware needed for the chain-drive gear replacement.
This does not mean every opener needs every component replaced. The repair should follow the manufacturer’s parts configuration and the actual condition of the machine.
Replacement Gear Kit vs. Individual Gear
An individual gear may be less comprehensive because it replaces only one component.
A complete gear-and-sprocket kit is intended to address a broader portion of the drive assembly.
This can simplify parts selection and reduce the possibility of installing a new gear alongside worn supporting components.
The trade-off is that the kit is more extensive than replacing a single component.
For a repair involving significant internal wear, having the related parts together can make the job more straightforward.
Gear Kit vs. Complete Garage Door Opener Replacement
Replacing a gear assembly and replacing the entire opener are fundamentally different approaches.
A gear repair focuses on a specific mechanical problem.
A complete opener replacement addresses the entire machine, potentially bringing newer safety, connectivity, lighting, battery-backup, or control features depending on the selected model.
Repair can make sense when the existing opener remains in suitable condition and the problem is isolated to replaceable mechanical components.
Complete replacement may be more appropriate when multiple major components are failing or when the opener’s age and safety features make continued repair less practical.
There is no universal answer. The decision depends on the condition of the opener, repair requirements, available parts, labor, and the owner’s preferences.
Gear Kit vs. Screw-Drive Repair Parts
A chain-drive opener uses a chain and sprocket system.
A screw-drive opener uses a threaded drive mechanism.
Their internal components are therefore different.
A gear-and-sprocket kit intended for a chain-drive system should not be treated as a universal garage door opener repair kit.
Always identify the drive type before ordering.
Gear Kit vs. Belt-Drive Repair
Belt-drive openers use a belt instead of a traditional metal chain.
They can have different internal transmission components and replacement requirements.
A 41C4220A-compatible chain-drive kit should therefore not be selected for a belt-drive opener simply because both systems have similar horsepower ratings.
The drive mechanism is the more relevant distinction.
Potential Symptoms That Require Broader Diagnosis
A worn gear is not always the root cause of garage door problems.
If the garage door is difficult to move manually, the problem may involve springs, rollers, tracks, hinges, or door balance.
If the motor does not run at all, the problem may involve the electrical supply, control board, limit system, or motor.
If the chain moves but the door does not respond properly, the issue could involve the trolley or door connection.
If the opener repeatedly reverses, safety sensors or other control systems may be involved.
Replacing the gear without diagnosing these other symptoms can result in an incomplete repair.
Maintenance After a Gear Repair
Once a replacement gear assembly has been installed, routine observation remains useful.
Listen for unusual sounds during operation.
Watch for jerky movement.
Pay attention to changes in chain movement.
Inspect the opener if a new grinding noise appears.
Most importantly, ensure the garage door itself is operating correctly.
A properly balanced door should not require the opener to compensate for major mechanical resistance.
Regular maintenance of the garage door’s rollers, hinges, tracks, and other components should follow the manufacturer’s recommendations.
When Professional Service Makes Sense
DIY mechanical repairs can be practical for experienced users, but garage door systems involve significant hazards.
Professional service is worth considering when:
- The door’s springs need adjustment or replacement
- The door is severely unbalanced
- The opener’s mounting is damaged
- Electrical wiring requires repair
- The diagnosis is uncertain
- The opener has multiple simultaneous failures
- The technician lacks the necessary tools
- The repair requires working around highly tensioned components
A gear replacement should never require taking unnecessary risks with the garage door’s spring system.
Frequently Asked Questions
What is the 41C4220A gear and sprocket kit used for?
It is a replacement assembly for compatible chain-drive garage door openers. The kit addresses components within the opener’s mechanical drive system, including the gear and sprocket assembly.
Which brands can use this type of replacement kit?
The product is marketed for compatible LiftMaster, Chamberlain, Sears, and Craftsman chain-drive models. Compatibility depends on the exact opener model and configuration.
Does it fit 1/3 HP and 1/2 HP openers?
The referenced product is marketed for compatible 1/3 HP and 1/2 HP chain-drive models. Horsepower alone is not enough to confirm compatibility, so the exact model number should also be checked.
What parts are included?
The official Chamberlain 041C4220A description identifies a helical gear and top-hat assembly, worm gear, wear bushings, grease, and required hardware. The exact contents of a third-party replacement should be confirmed against the Amazon listing before ordering.
Is 41C4220A the same as 41A2827?
The manufacturer identifies 41A2827, 41C4220C, 41C4220, and 41C4220A as associated names or part numbers for the gear and sprocket kit. Always verify the replacement number against the specific opener.
How can I tell whether my opener is chain drive?
A chain-drive opener uses a visible chain running along the rail between the motor unit and trolley. Other opener types use belts or screw mechanisms. If the drive type is unclear, consult the opener’s manual or manufacturer documentation.
What symptoms can indicate worn gears?
Possible symptoms include grinding noises, abnormal mechanical operation, failure to transfer motor movement to the chain, or intermittent movement. These symptoms can also have other causes, so diagnosis is important.
Can I replace the gear without replacing the whole opener?
In a compatible opener, a gear-and-sprocket repair can address a specific mechanical failure without replacing the complete opener. Whether this makes sense depends on the condition and age of the rest of the system.
Is this a universal garage door opener gear kit?
No. It is intended for specific compatible chain-drive configurations. Model verification is essential.
Can I use this on a screw-drive opener?
A chain-drive gear and sprocket kit should not be used for a screw-drive opener unless the manufacturer specifically identifies the part as compatible. Screw-drive systems use a different drive mechanism.
Can I use it on a belt-drive opener?
The same principle applies. Belt-drive openers use a different transmission arrangement, so compatibility must be confirmed for the exact model.
Should I replace the gear if the door is difficult to lift manually?
Not necessarily. A difficult-to-move door can indicate problems with springs, rollers, tracks, hinges, or balance. The gear should not automatically be blamed for every opener-related symptom.
Is garage door gear replacement a DIY project?
It can be performed by experienced DIY users on compatible systems, but it requires careful attention to electrical and mechanical safety. Work involving the door’s springs should generally be left to appropriately trained professionals.
Does replacing the gear make an old opener new?
No. A gear repair addresses specific mechanical components. Other parts of an older opener—including electronics, motor components, safety systems, and structural components—remain the same unless separately repaired or replaced.
How should I confirm compatibility before ordering?
Find the exact model number on the opener, identify whether it is chain drive, compare the model against the manufacturer’s parts documentation, and check the replacement part number. Chamberlain specifically recommends using the owner’s manual or replacement-parts diagram to verify compatibility.
Conclusion
A garage door opener’s internal gear system plays an important role in transferring motor power to the chain mechanism. Over time, repeated operation can contribute to wear in the helical gear, worm gear, bushings, bearings, and sprocket assembly.
The 41C4220A gear and sprocket kit is designed for compatible chain-drive garage door openers and is marketed for certain LiftMaster, Chamberlain, Sears, and Craftsman 1/3 HP and 1/2 HP systems. The official Chamberlain version includes several related drive components, including the helical gear and top-hat assembly, worm gear, wear bushings, grease, and hardware.
The main practical advantage of a complete gear-and-sprocket repair is that it addresses multiple related components within the drive mechanism rather than focusing on a single worn gear.
However, compatibility should be treated as the first priority. Garage door openers have numerous model variations, and horsepower or brand alone does not establish that a particular kit will fit. Checking the exact model number and the manufacturer’s replacement-parts information is a much safer approach.
It is also important to diagnose the actual cause of the garage door problem before replacing internal components. Grinding noises, failure to move the chain, and intermittent operation can be associated with gear wear, but similar symptoms may result from other mechanical or electrical problems.
For a compatible opener that otherwise remains in suitable condition, a gear-and-sprocket repair can be one way to address a specific drive-system failure without replacing the complete machine. On the other hand, an opener with multiple aging components or significant safety concerns may require a broader service decision.
Anyone performing the repair should also respect the hazards associated with garage door systems. Disconnect electrical power as directed by the manufacturer, use the correct tools and instructions, and avoid working on highly tensioned springs unless properly trained.
A replacement gear kit is ultimately a repair component, not a universal solution for every garage door problem. Used with accurate model identification, appropriate diagnosis, and safe installation practices, it can provide a practical way to maintain a compatible chain-drive opener.